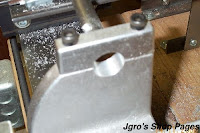

 Here are the castings for the headstock and bearing caps all machined up. The top face has been machined,but the bore is yet to be done.
Here I am getting the temporary spindle set up for boring the headstock. I did it the way Gingery describes in his book.
I attached the headstock a little different than described in the book. I used a piece of aluminum C-channel that fit perfectly around the coupling nut. I ended up using a small c-clamp to hold the coupling nut tight inside the c-channel to keep it from moving fore and aft within the c-channel. It worked pretty well.
Now I have the spindle ready to go. It is aligned to the ways and held between the pillow block bearings with shaft collars. The pillow block bearings were purchased at a local hardware store. In the second image, I'm seeing how lined up the spindle is to the headstock casting.
Cutting the first bore. Since I did not want to try and make a square hole in my spindle for the cutter, I just drilled a 1/4" hole in the spindle and made a cutter from a dowel pin. It wasn't hardened all the way through, which worried me a little, but in the end it worked just fine. I was only taking .010-.020 off in a pass. When I first started boring the hole, I had the boring bar extended all the way out. I was getting some chatter when cutting, so I pulled the boring bar as far to the left as I could to shorten up the amount it was hanging out of the pillow blocks.
Getting ready to bore the second hole. I put some bronze bushings in the first hole to help keep the boring bar supported while I bored the second hole. You can see my dowel pin cutter laying in the headstock. I ran into a problem when first cutting this hole. The cutter kept making a tick-tick sound and the surface finish in part of the hole was horrible. It was like the aluminum had a hard spot or something. I finally figured out that the cutter was hitting the shims that I had placed between the headstock and the clamps. Since I had .100" to go on the bore size, I unbolted the clamp, trimmed the shims and bolted it back together and aligned the bore as close as I could. I didn't have any more problems boring after that.
The bore ended up at exactly .999" The headstock got bolted permanently to the ways and the boring bar set up for the next step of making the lead screw pulleys.


Great Job with the lathe so far, keep it up. I'm about 50% done my tailstock, and will have some a blog post and video up soon on building that. If you are interested, checkout what I've done with my gingery lathe when you have a chance - I modified it quite a bit : My Gingery Lathe
ReplyDelete